
1) The most important tool for nail trims, is the nail clippers themselves. There are a few options out there for nail clippers for dogs, primarily being the ‘scissor’ or ‘guillotine’ style. The choice is really based on personal preference, I prefer the scissor style of clippers because guillotine-style can sometimes squeeze or crush the nail which is uncomfortable for the dog. For cats, there is basically one option which is a smaller scissor-style—I do recommend this over using human nail clippers which will often crush the nail as it cuts.
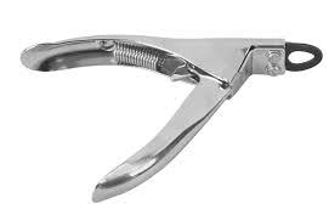
Guillotine Style
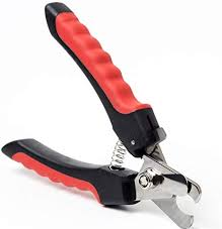
Scissor Style
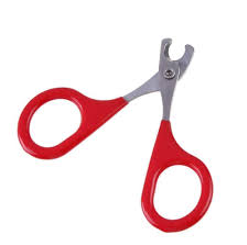
Cat Clippers


How to trim the nails
The first step is finding the restraint that works best for you and your pet. Some people prefer trimming nails with the pet on their side, some while standing. Also our pets may have a preference of lying on their side versus standing for the nail trim.
Of course, we do all we can to avoid cutting the quick. The quick grows out with the nail over time, so keep in mind that a longer nail will have a longer quick. As a general rule, we try to clip small amounts and gradually make the nail shorter until we get close to the quick. The outer surface of the nail is hard and doesn’t have any feeling. If you look under your dog’s nail, there is a more fleshy/soft area as it gets closer to the nail bed – this is where the quick lives, so stop when you get there. If you look at the cut surface of the nail while trimming, you will see the outer nail layer and as you cut shorter the center will become softer.
Let’s look at the photo below—see the black nail on the right with the fleshy tissue under the hard nail surface? Yes that’s where the quick is, I have cut up to that area and stopped because any further could cause bleeding.

Cat nails are different from dogs, in that they have retractable nails. When you pick up your cat’s paw you won’t see the whole nail, so you have to push above and below the paw pad to push the nail out fully. Cats tend to have white nails, which are a lot more helpful because you can actually see the quick through the nail. One quick clip of the tip/hook of the nail is usually all you need for a cat nail trim – which is nice because they usually have a lot less patience than dogs.

The frequency of nail trimming is somewhat dependent on the type of surfaces your pet walks on – a dog that goes for a lot of walks on concrete sidewalks may need less nail trimming than a dog on grass only. Your dog will be most comfortable when their nails aren’t touching the ground, which puts unwanted pressure on the nail and toe. A dog whose nails are already at this level can likely go every few weeks for a nail trim. If we are working to shorten the nail, weekly trimming is necessary to allow the quick to recede without letting it grow back out with the nail.
What if my pet really doesn’t like having their nails trimmed?
This is definitely a common occurrence, and one of the top reasons people choose to bring their pets in for nail trims. I can provide you with some tips and tricks to help make nail trims more enjoyable for you and your pet
1) Start slow – don’t feel like you have to clip every nail in one setting. Getting your pet into position, giving lots of treats, and trimming one nail can be a big milestone for a lot of pets. You may even have to start slower than that:
Day 1 – pick up your pets paws and rub them, press on the toes, move them around, then give a treat and praise.
Day 2 – do the same thing, touch the nail clippers to the toes, squeeze the clippers without trimming a nail so they can get used to the sound, give a treat and praise
Day 3 – depending on how your pet did on day 2, repeat day 2 or move along to trim one nail, give treats and praise
The next few days, continue moving step by step until you are able to trim multiple nails. If your pet decides to follow a different/slower timeline – don’t worry! Everything takes time, especially if we want to have pets that are comfortable and confident for nail trim time
2) Distraction! As mentioned above, treats can make a big difference. Treats that your pets has to lick constantly can really help because single treats have a chew-swallow-remember what’s happening until we get the next treat- type pattern, so constant distraction can be key
3) Patience. This is a hard one for a lot of us. Remember not to scold your pet when they misbehave during a nail trim. Let’s face it, nail trims are not that fun, and your pet will be looking for any reason to dislike them more so let’s not give them that reason!
4) Cats. If your cat gets a bit spicy during nail trims, you can try sneaking in a clip or two while they are sleeping. If your cat likes to sleep on your lap, keep the clippers next to your favourite spot so you are prepared for a sneaky nail trim without disturbing them. Of course this can be applied to dogs as well.
5) Keep your safety in mind. If your dog tends to bite when their paws are touched, having them wear a muzzle will keep you safe while you create a positive experience for your dog. Be sure to give treats once the trim is done and the muzzle is removed!
6) If your dog continues to be unruly for nail trims and you and their safety is compromised, there are medications available that can be given to your dog to calm them and make them more amenable to the trimming process. These are prescription medications, so please consult your veterinarian to discuss if this is a good option for your pet. Your veterinarian will need to have a thorough history for your pet and have seen them in the past 12 months in order to write the prescription.
Hopefully this will help you as you embark on your at home nail trims!
")
Written by Dr. Kristen Wilson